Assignment 3
Thursday, March 3, 2011
For this assignment, the requirement is to use a series of photographs to show a linear story.
I don't have the equipment to take photographs of myself (other than close-up "camwhore" shots), and I didn't want to trouble others to model for me, so I decided to have an inanimate object as the subject of the photographs.
The story that I eventually came up with was inspired partially by the Disney movie "The Princess and the Frog", where a firefly falls in love with a star he sees in the sky. I happen to have a stuffed toy star with rather expressive-looking eyes, so I decided to create a little fantasy story about a toy star that fell in love with a real star in the sky.
I did some rough sketches of the scenes to include, with the sequence numbered:

Scene #1
My first scene is an establishing shot, basically saying, "Once upon a time, there was a toy star who lived happily with all its other stuffed toy friends." It shows a bunch of soft toys having a tea party.
The first photo I took for this scene is an over-the-shoulder shot from behind one of the soft toys (the teddy bear), focussing on the star:
 scene 1: over the shoulder
I personally found the shot aesthetically pleasing and liked it a lot, but I also felt that the angle and shot size was not really appropriate for an introductory shot.
I then tried out a bird's eye view shot, showing the tea party from directly above:
 scene 1: bird's eye view
This shot was not very satisfactory in terms of aesthetics, partially because I just stood on a chair, raised the camera above my head and snapped it without being able to see the composition. Also, the scene is supposed to convey the idea of the soft toys having fun, but this shot is very cold and distant, so the cheerful mood doesn't really come through.
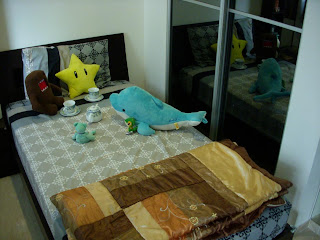
Finally, I did a normal long shot, showing the bed with the toys on it:
 scene 1: long shot
This is the shot that I included in my final prototype, after some minor photo editing in Photoshop. The long shot is appropriate for a lead-in, and the shot is not too bad aesthetically as well.
Scene #2
The second panel shows the toy star looking out of the window at night, when its friends are all sleeping in bed.
I tried another long shot for this:
 scene 2: long shot
I didn't find this shot size very appropriate, since the focus of the shot (which is supposed to be the star) is not very obvious.
So, instead, I moved in closer:
 scene 2: mid shot
I found this more appropriate as there is enough environmental information to show the other toys sleeping, while keeping the main focus on the toy star's actions. Thus, this is the shot that I used for my final prototype.
Scene #3
The third panel shows what the star sees through the window, which is a beautiful shining star in the night sky.
I used an over-the-shoulder shot for this:
 scene 3: over the shoulder
I was satisfied with this shot, since it gives the impression of being from the perspective of the toy star. I didn't think a point-of-view shot would be good as removing the star from the scene would break the flow of the story (there's no way to tell that the scene outside is the scene seen from the window).
Scene #4
The fourth panel is intended to show the reaction / emotion of the toy star upon seeing the real star. Since this is the case, shot size pretty much has to be close up. Nonetheless, that still left some room to experiment with angles.
I first tried a low angle shot, to give the viewer the same feeling of looking up as the star:
 scene 4: low angle
However, the effect was not satisfactory. One thing is that the star looks kind of intimidating due to the effect of the low angle. Also, the eyes of the star are not fully visible, so emotion cannot be properly conveyed.
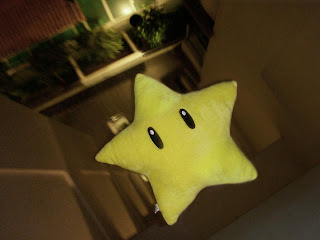
I then tried a high angle shot:
 scene 4: high angle
The eyes are more visible in this shot. However, the star looks kind of scared (due to the vulnerability imposed by the high angle shot). This was not the effect I wanted, since the star was supposed to be falling in love, not being afraid.
So I went for an eye level shot:
 scene 4: eye level
There is a full view of the star's face, which is good for conveying emotion. Also, the audience will be at a comfortable, familiar eye level with the star. This the audience to relate more closely with the star's feelings.
Scene #5
Spurred by its attraction for the real star, the toy star climbs the stars to get closer to it. This is the scene to be captured in the fifth panel.
I wanted to capture the struggle of a little toy star climbing big steps made for humans. There were two ways to do this: make the star seem weaker, or make the stairs seem more intimidating. I tried both:
 scene 5: high angle
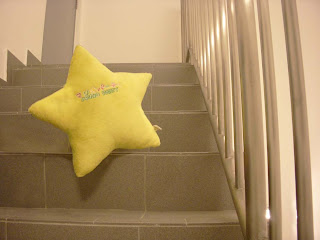
 scene 5: low angle
The first high angle shot makes the star seem vulnerable. On the other hand, the low angle shot makes the stairs seem more daunting. Both achieve the effect of making the star's actions seem difficult. After struggling with the decision for a while, I decided on the low angle shot, mainly because the upwards viewing angle conveys more of the star's intention to move upwards.
Scene #6
The sixth scene in the story takes place on the roof of the building, where the toy star jumps out in hopes of reaching the real star. I had a lot of problems with this scene, since I actually had to take it out on the roof at night. The lighting was horrible, and I had a lot of angle problems. For instance, there were issues with the blank white wall surrounding the roof filling up half the shot and making it quite ugly. Also, I needed the star to look like it was jumping OUT while looking UP at the sky. This proved to be very challenging to achieve. The star ended up either weirdly positioned, or looking in the wrong angle.
Some examples of failed shots:
 star looking in the wrong direction
 too much wall
 direction of the star's movement is not clear
Finally, after retaking the shots repeatedly and exhausting my helper, I managed to get this:
Enough sky visible, not too much wall, and the star looks reasonably like it is jumping out off the roof. I didn't think I could get much better after more than an hour of trying, so I settled for this and moved on.
Scene #7
The seventh panel shows a scene of the toy star crying as it falls, unable to fly and reach the real star. For this, I had my helper (who had long arms!) hold the star over the edge of the roof.
On my first try, I got this:
The star's face and the floor below are both visible enough, but the shot looks quite boring and static.
So I tried again, using a slanted dutch angle this time:
 scene 7: dutch angle
The shot turned out looking more dynamic, and there's more of the "topsy turvy" feeling of tumbling down through the air. I also managed to get a nice effect where the background is blurred while the star is in focus, which also gives the feeling of movement.
Scene #8
The eight panel is a shot of the empty floor, implying that the star disappeared after falling. Although the story takes place at night, this shot was taken during the day as it is too dark for the floor to be clearly visible from the roof at night. I took this in a dutch angle as well, to create a slightly confused, jarring effect ("eh? why is the star gone?!"):
 scene 8: dutch angle
Scene #9
The concluding shot shows a happy ending after the suspense of the previous shot. There is a view of the night sky (the same view as when the star looked out the window), and there are now two shining stars in the sky. It is implied that the toy star managed to become a real star and can be together with the star it fell in love with.
For this scene, I took basically the same shot as in Scene #3, except without the toy star in it:

Photo Editing
Having finished taking the raw photographs, I then had to edit for lighting and colour to achieve the effects I wanted. I also had to do some photo manipulation, such as adding in the shining star in the sky and the tears in the toy star's eyes as it falls.
Before I could get to that, however, I faced a big problem with panels 5, 6 and 7. Unlike in the story, the stuffed toy that starred in my photos is not a magical animated toy. My helper had to hold it in position for these shots, and his hand is very clearly visible in the photos.
To solve this, I actually took two photos for each scene, each with my helper's hand in two different positions. To get a photo without his hand, I had to merge the two. I'll use panel 7 as an example. The two raw photos that I had to work with were:


However, there were some complications that made the process a lot more difficult. Firstly, the colours in the two photos are slightly different. The position of the star is also not exactly the same (inevitable, since my helper had to switch hands). Additionally, the background blur effect, which I wanted, occurs only in the first photo but not in the second. To solve these problems, I did the following:
1) adjust the brightness/contrast and hue/saturation of the cropped area (the right section of the second photo) to match the first photo.
2) use clone stamp to blend the cropped area into the first photo
3) select and apply motion blur filter to the background of the cropped area to make it seem blurred like the rest of the first photo
After struggling through the tedious process, I managed to get a passably convincing manipulated photo:

I repeated similar processes for panels 5 and 6 to remove my helper's hand from the picture.
I also had to do some photo manipulation for panels 3, 4, 6, 7 and 9.
For panel 3, the actual stars in the sky were neither big nor bright enough to be captured in my camera, so I had to create an artificial, exaggerated star to make the story clear. To do this, I simply used the soft edge brush to draw a long white vertical line, followed by a shorter horizontal line cutting across its centre, and finally two diagonal lines crisscrossing over the middle (each line is on a separate layer). I then applied motion blur in a parallel angle to each of the four lines, and used the soft edge brush in a bigger diameter to make a "glowing orb" in the centre of the lines. The process looks something like this:
 four straight white lines
 parallel motion blur
 add the "glowing orb" to get a shining star!
I used this technique to create stars for the sky in panels 3, 6 and 9, and also to make sparkles in the toy star's eyes for panel 4. The other edit I did in panel 4 is simple--just drawing pink hearts around the star to indicate it falling in love.
The most complicated manipulation comes in panel 7, which is the star falling. I wanted the star to be crying, so I needed to draw artificial tears. I had a lot of trouble with this, until I found some a detailed video tutorial on the internet about using layer styles to create water droplets.
The tutorial can be found at this URL:
http://abduzeedo.com/water-drops-photoshop-5-minutes
It worked pretty well, and I managed to get water droplets that were quite realistic looking. Additionally, these could be painted on with a brush, so I could edit the shapes of the teardrops to my liking. However, one down side is that the effect is only for small droplets, and making bigger patches creates something that looks like a puddle instead of a teardrop. So I was limited to just making small droplets of tears brimming out of the toy star's eyes.
Final Prototype!
Thus, with all the tedious editing done, the 9 colour-edited and manipulated photos for my final prototype are as follows:
 photo edited for a more vibrant, cheerful feel
 area around the sleeping toys dimmed to place emphasis on the star
 artificial star in sky; artificial "reflection" of star to show that it is looking through window glass
 sparkles in the star's eyes, pink hearts around the head
 manipulated to make star seem like it's climbing stairs by itself
 artificial star in sky; manipulated to make star seem like it's jumping by itself
 artificial teardrops; manipulated to make star seem like it's falling
 darkened to make it seem like night
 artificial stars in sky
"Once upon a time, there was a toy star who lived happily with its other stuffed toy friends. One night, while the other toys were sleeping, the toy star looked out of the window and saw a shining star in the night sky. Enchanted by the real star's beautiful glow, the toy star fell in love. Determined to get closer to the real star, the toy star climbs up the stairs to the roof, where it jumps off, hoping to fly up and reach the real star. However, it was futile, and the toy star sheds tears as it falls to the ground. Suddenly, the toy star disappears from the ground where it fell. And then there were two stars in the sky that night, and they twinkled happily ever after."
Further Refinements
After presenting my prototype in tutorial, I had feedback that panel 8 (the empty floor) was a bit unclear. To make it clearer that the star fell to the ground and then disappeared, it is suggested that I do some further photo manipulation to create a translucent star "fading" away from the ground.
Revising my work while taking this feedback into consideration, I took two new raw shots for panel 8, one of the empty floor and one of my star.
First, I cropped out the toy star and placed it into the photo of the floor. I also used the clone stamp tool to cover part of the star's eyes and make it look like it is dying and semi-conscious after falling to the floor. Eyelashes and eyebrows were drawn into using the brush tool:

After this, I added tears flowing down the star's face:
 Finally, I reduced the opacity of the layers with the star and the tears to make it seem like it is disappearing and fading away. The new version of panel 8 is as follows:
posted at
22:08


 photo edited for a more vibrant, cheerful feel
 area around the sleeping toys dimmed to place emphasis on the star
 artificial star in sky; artificial "reflection" of star to show that it is looking through window glass
 sparkles in the star's eyes, pink hearts around the head
 manipulated to make star seem like it's climbing stairs by itself
 artificial star in sky; manipulated to make star seem like it's jumping by itself
 artificial teardrops; manipulated to make star seem like it's falling
 darkened to make it seem like night
 artificial stars in sky

